12. Student Accounting
Every student in Studioware receives a financial account where transactions are recorded. Students that are grouped together into a Family, have a family financial account. In accounting terms, the student and family financial accounts are called "Accounts Receivable" accounts. Automatic transactions are "posted" to the accounts when certain events occur in Studioware, such as enrolling in a class or dropping a class. Manual transactions can also be entered into the accounts.
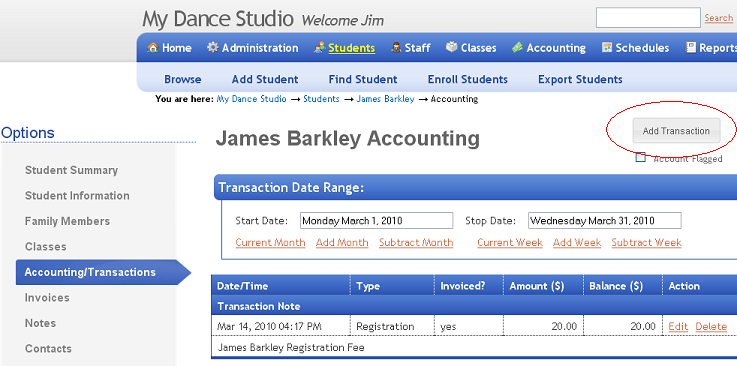
To access a student's financial account, open the student's data record and click on the "Accounting/Transactions" option. By default, Studioware always shows the transactions from the current month. You can easily change the date range of the transactions by manually entering in a start/stop date, clicking on the "Current Month" link, or cycling through the months by clicking on "Add Month" and "Subtract Month". Similarly, you can view the current week of transactions by clicking on "Current Week" or cycle through the weeks by clicking on "Add Week" or "Subtract Week":

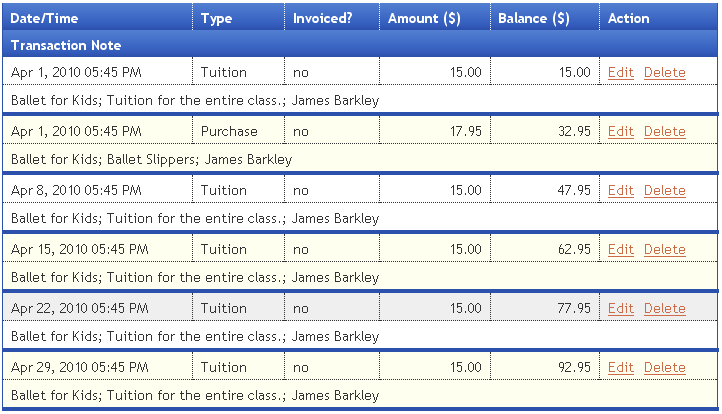
Once the transaction date range has been specified, the transaction list is displayed:
Finally, the transaction summary is displayed:
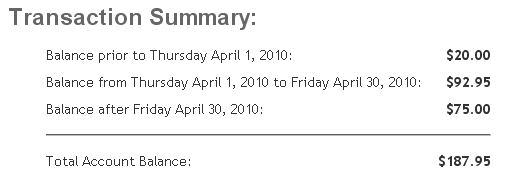
The transaction summary shows that:
- The account's total balance is $187.95. This is the summation of all transactions in the account.
- The account's current month balance (April 2010) is $92.95. This is the summation of the transactions that are displayed in the grid. That is, there are 5 tuition transactions for $15.00 (which totals $75.00) and a a purchase transaction of $17.95 for a total of $92.95.
- The summation of all transactions prior to the current month (April 2010) is $20. Typically, you want this value to be close to $0.00 indicating that the student's account is not in arrears.
- Finally, the amount $75.00 in the Tuition Summary represents the amount the student owes in the future, that is, after the current month. Typically, this implies that the student is enrolled in a class and there are future payments due at the individual class dates.
Financial Transactions
To add a new transaction to a student's account, follow these instructions:
-
Open a student's data record, click on the "Accounting/Transactions" option followed by the "Add Transaction" button.
-
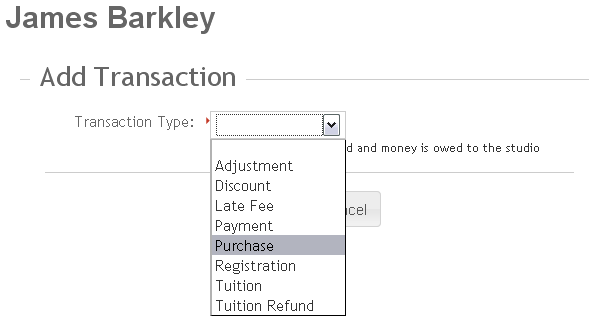
Select the type of transaction to add to the student's account. In this example, assume the student has made a purchase, therefore, a "purchase" transaction will be recorded.
-
In this transaction, assume that the student purchased a t-shirt which sells for $19.95. Furthermore, assume the studio needs to add an additional 8.75% sales tax (or VAT). Finally, assume that the student makes a partial payment towards the purchase of $10.00. The Purchase transaction will appear as follows:
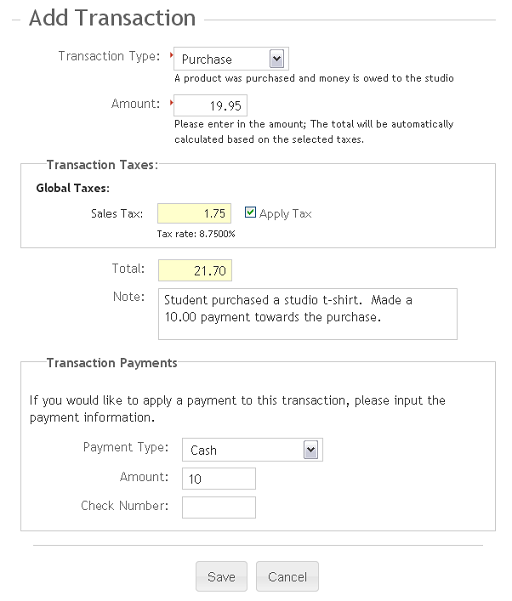
Please note that Studioware automatically calculates the Sales Tax and Total amounts. To exclude the sales tax from the calculation, uncheck the "Apply Tax" checkbox. Finally, click on "Save" to post this transaction to the account. -
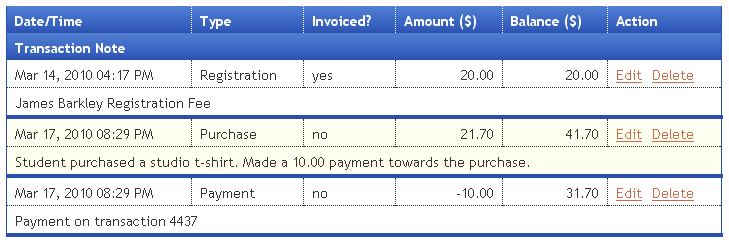
In the above scenario, Studioware actually posted 2 transactions to the account: a purchase transaction and a payment transaction to represent the partial payment on the account:
- To edit a transaction, click on the "Edit" link next to the transaction. For example, i the student in the above example paid $12.00 instead of $10.00, we could edit the transaction and enter in the correct amount.
-
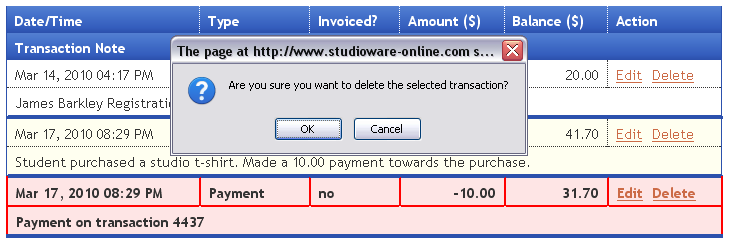
To delete a transaction, click on the "Delete" link next to the transaction. The selected transaction will be high-lighted in red and a confirmation box will be displayed. Click on "Ok" in the confirmation dialog box to delete the transaction.
The "Invoiced?" column in the transaction grid indicates if the transaction is part of an invoice. If a transaction is part of an invoice (that is, Invoiced? will state "yes"), then the transaction cannot be edited or deleted (unless the invoice is canceled thereby releasing the transaction from the invoice.
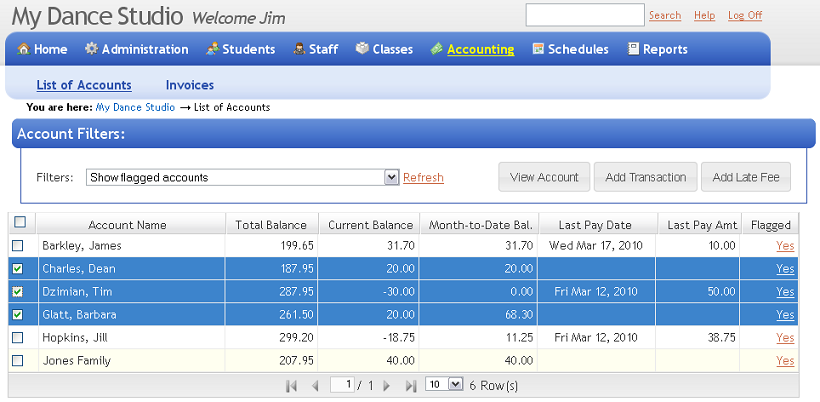
Browsing All Accounts
If you click on the "Accounting" main menu followed by "List of Account" you can see all your student and family accounts in the grid. By clicking on the column headers in the grid, your can sort the accounts. By selecting an item in the "Filters" drop down list, you can display a sub-set of your accounts, such as "Show accounts with no payments in the last 60 days.", or "Show all accounts for students in the class...".
Another feature of the "List of Accounts" is the ability to add a transaction to multiple accounts. For example, you could apply the "Show accounts with no payments in the last 60 days" filter, select one ore more accounts in the grid, and add a Late Fee transactions to the selected accounts: